These instructions are for configuring Mac OS X Mail version 1.3.x found in Panther. The concepts for setting up earlier versions are similar, but layouts and wording may be different.
You will need the following information in order to setup an account.
E-mail Address:
User Name:
Password:
Incoming Mail Server:
Outgoing Mail Server (SMTP):
You can look up the settings for your e-mail here:
http://tools.estreet.com/emailSupport/emailinfolookup.lasso
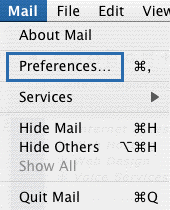
With Mail running:
1 – Go to the ‘Mail’ menu and select ‘Preferences’.
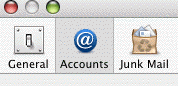
2 – Click on the ‘Accounts’ button near the top of the preferences window.
3 – Click the ‘+’ button found at the bottom of accounts list to create a new account.
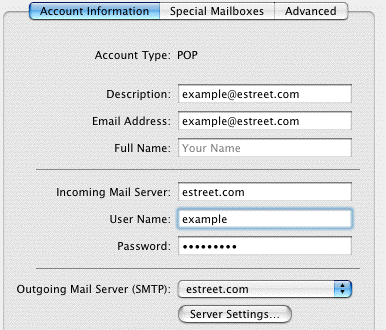
4 – Fill in all information under the ‘Account Information’ tab. This tab tells Mail how to send and receive your e-mail
– Account Type should be ‘POP’
– Description is used to differentiate different accounts in Mail. You can enter anything into this field. We recommend entering the e-mail address you are setting up.
– Email Address – Enter the e-mail address you are setting up .
– Full Name – This is the name people will see when you send them an e-mail. It can be any name or nickname you like.
– Incoming Mail Server – Enter your incoming mail server .
– User Name – Enter your user name . This is your full email address.
– Password – If you don’t want to have to type in your e-mail password every time you check your mail, enter your password.
– Outgoing Mail Server (SMTP) – Select your outgoing mail server from the pull down menu . If you don’t see your server, select ‘Add Server…’ and enter the ‘Outgoing Mail Server’. Unless otherwise specified, you do not need to enter anything else in the window. Click the ‘OK’ button on the SMTP Server Options window when finished.
5 – Go to the ‘Advanced’ tab.
6 – Check ‘Remove copy from server after retrieving a message’ and select ‘Right Away’ from the pull down menu.
Close the Preferences window and you are ready to send and receive mail.