Configuration for Zoom X5 ADSL Router Configurations for E Street DSL.
Connect to the Zoom in your browser at 10.0.0.2
If your NIC card is set to obtain an IP address dynamically, you should automatically be assigned an IP address in this range.
You can do a hard reset by holding in the reset button (a paper clip works well for poking into the hole) found on the back of the modem for 5 seconds.
Default Authentication Info to get in to the Zoom:
Username: admin
Password: zoomadsl
For VoIP enabled routers, the password is: zoomvoip
***Dynamic IP Address Configuration:
Basic Setup Window:
-Leave the “I want to configure my modem:” button to Manually
-Current Connection: Enabled
-Encapsulation = PPPoA VC-Mux
-VPI: 0
-VCI: 32
-Username = xxx
-Password = xxx
-Click: Save Changes
-Click: Write Settings to Flash

***Single Static IP Addresses Configuration:
-Do the basic configuration from above
-The single static IP needs to be configured in Radius on E Street’s end.
***Full Static IP Address Configuration, (full subnet):
Go to the “Advanced Setup” window:
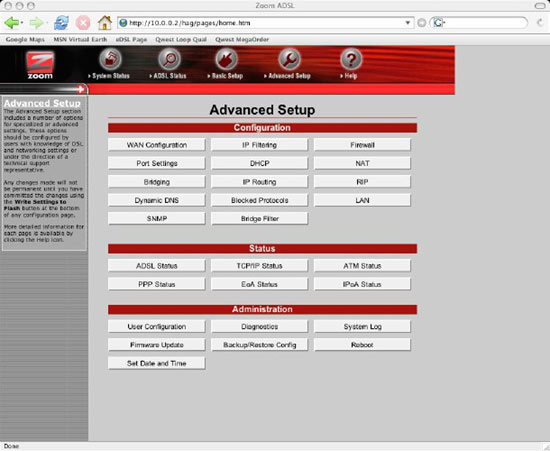
-Click on LAN
-In “Conf. LAN IP Address:” enter the static IP of the Zoom.
This is usually the first routable IP address in the block of addresses.
-In “Conf. LAN Network Mask:” enter the appropriate subnet mask.
-Click: Save Changes

At this point you will need to re-configure your computer to “talk” on the newly assigned block of addresses and then re-connect to the Zoom on the IP address you just configured in the “Conf. LAN IP Address:” field from above.
Once re-connected to the Zoom using the new IP addresses:
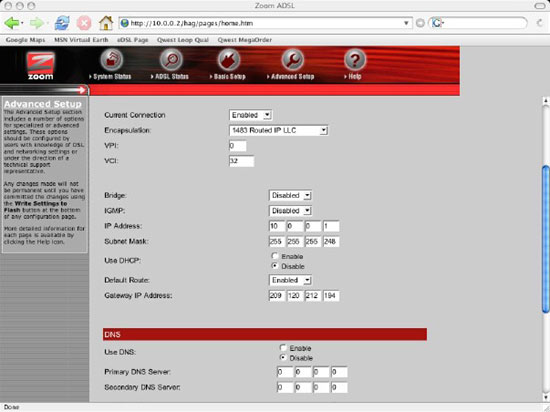
-Go to “Advanced Setup” window
-Go to “WAN Configuration”
-Current Connection “Enabled”
-Encapsulation “1483 Routed IP LLC”
-VPI = 0
-VCI = 32
-Bridge “Disabled”
-IGMP “Disabled”
-IP Address: 10.0.0.1
-Subnet Mask: 255.255.255.248
-Use DHCP “Disable”
-Default Route “Enabled”
-Gateway IP Address: 209.120.212.194
-Use DNS: Disable
-Click: Save Changes
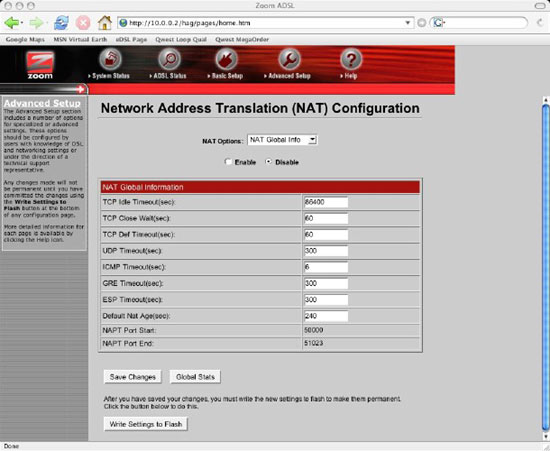
Then:
-Go to “Advanced Setup” window
-NAT
-Set to Disable
-Save Changes
Then:
-Go to “Advanced Setup” window
-DHCP
-DHCP Mode “None”
-Save Changes
-Write Settings to Flash
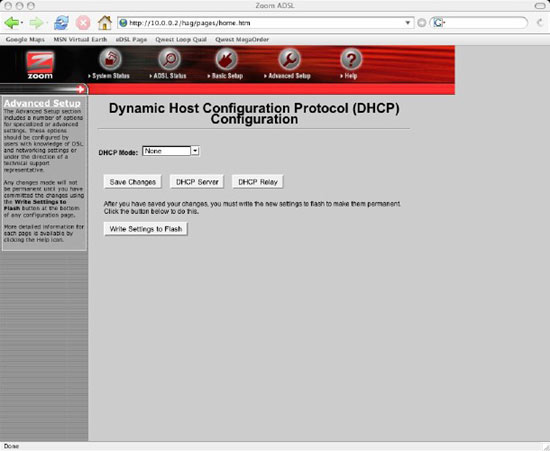
At this point your Zoom should be ready to use the full block of static IP addresses handed out by E Street.